People and devices tab
This topic describes the People and devices tab on the Case management view, which by default is located at the left of the ESPA analysis center screen. However if you require step-by-step procedures on using this tab refer to Using the People and devices tab.
The ESPA analysis center screen's People and devices tab allows you to view and edit targets and their associates, and add new targets. It also allows you to view which targets in other cases the associate has also been in contact with (ICW).
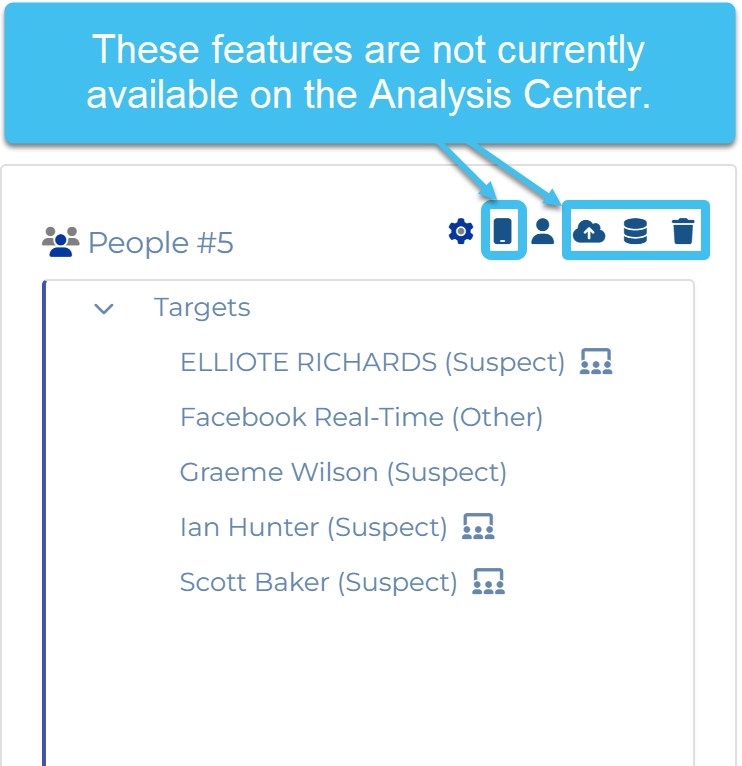
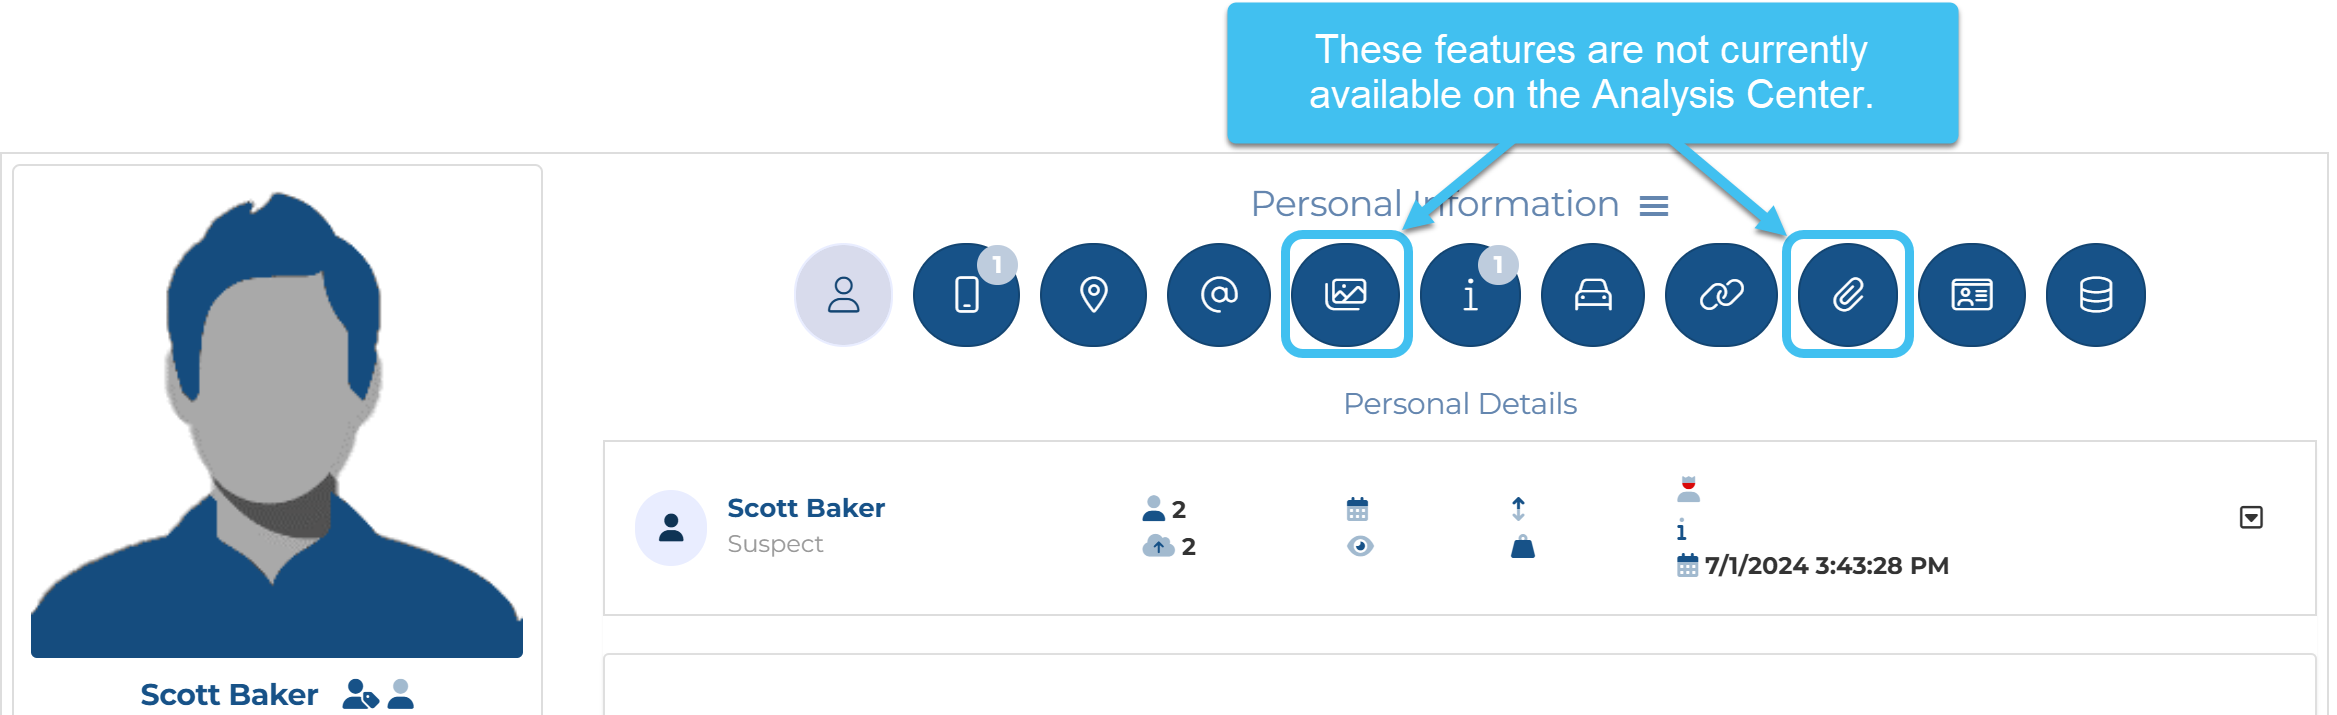
The tab provides the same features as the People and devices information section of the People and devices screen. However there are a few functions that are currently not available, these are:
-
adding a phone without adding a person, importing persons from a file, requesting public records and deleting people.
-
uploading pictures and attachments.
 People
This lists all the targets that have been added to the case. Click on a target to view or edit their details. If you edit their details you must click the relevant Save button to save any changes otherwise any changes you make are lost if you move to another screen.
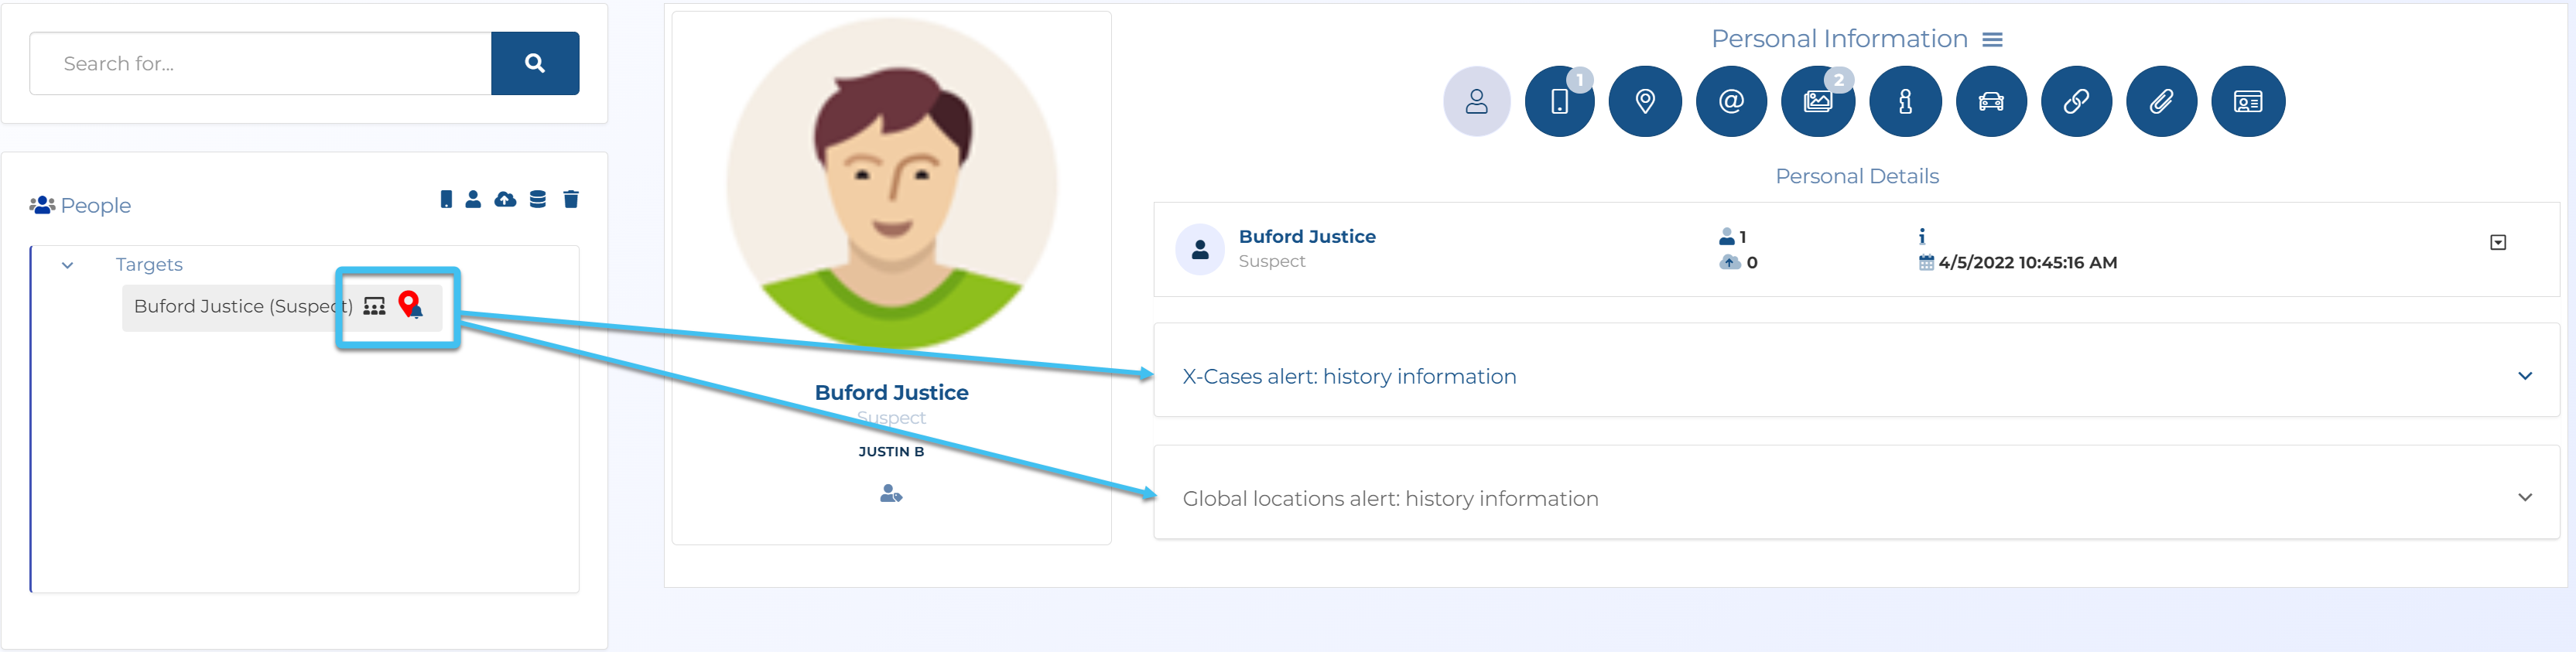
If a person has any x-case alerts or global locations alerts then icons are displayed after their name.
-
 alerts you to the fact that a target or associate phone number in the case also appears as a target or associate phone number in other cases.
 NOTE:
on the People and devices screen alerts you to the phone number being in another case as either a target or an associate.  on the Advanced view cases screen alerts you to a target phone number being in another case only as a target phone number.
 -
 alerts you to the fact that a target phone number in the case was at a global location event.
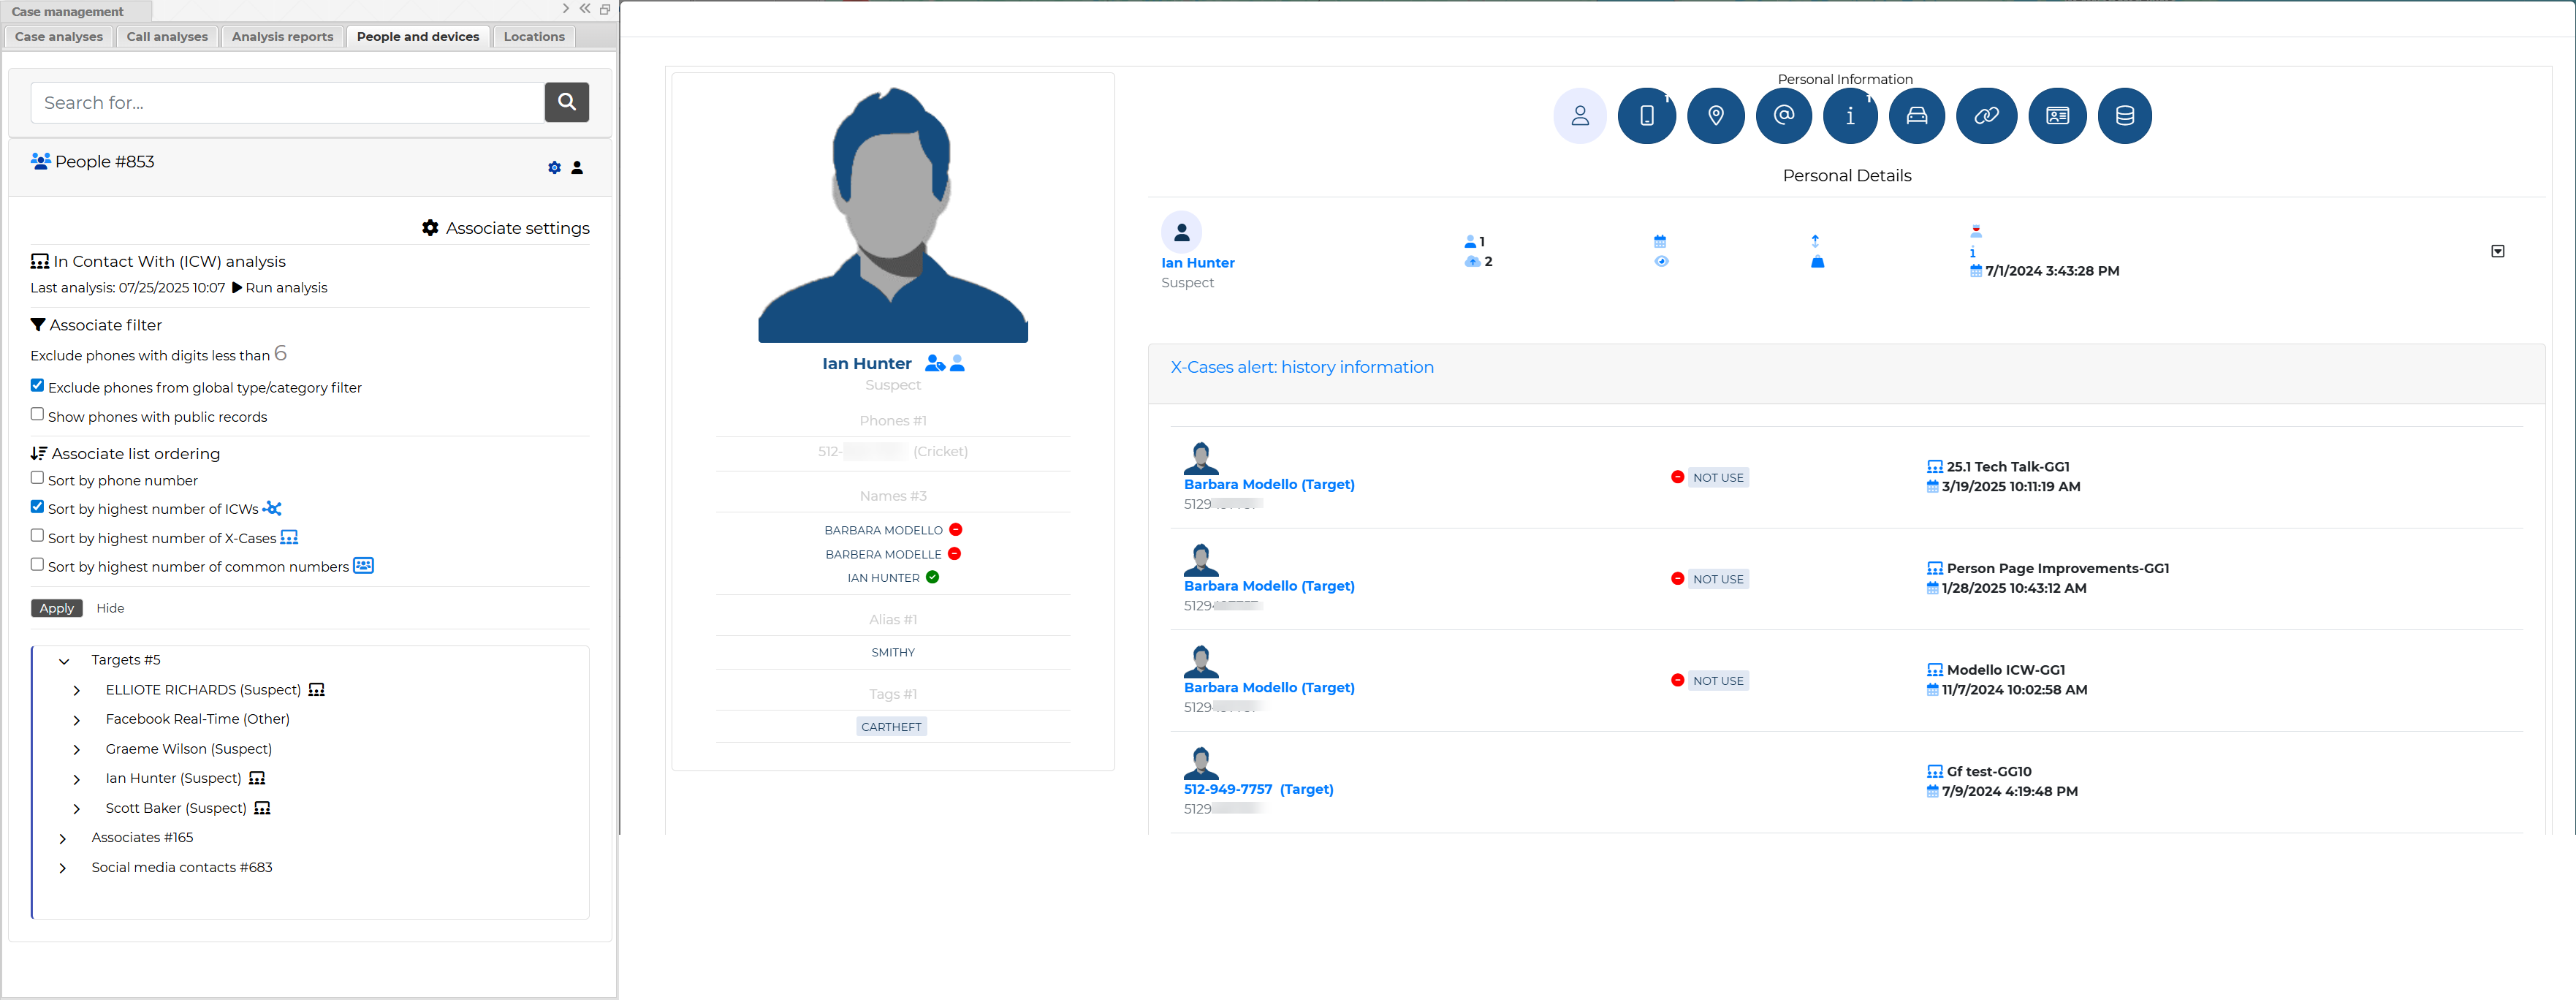
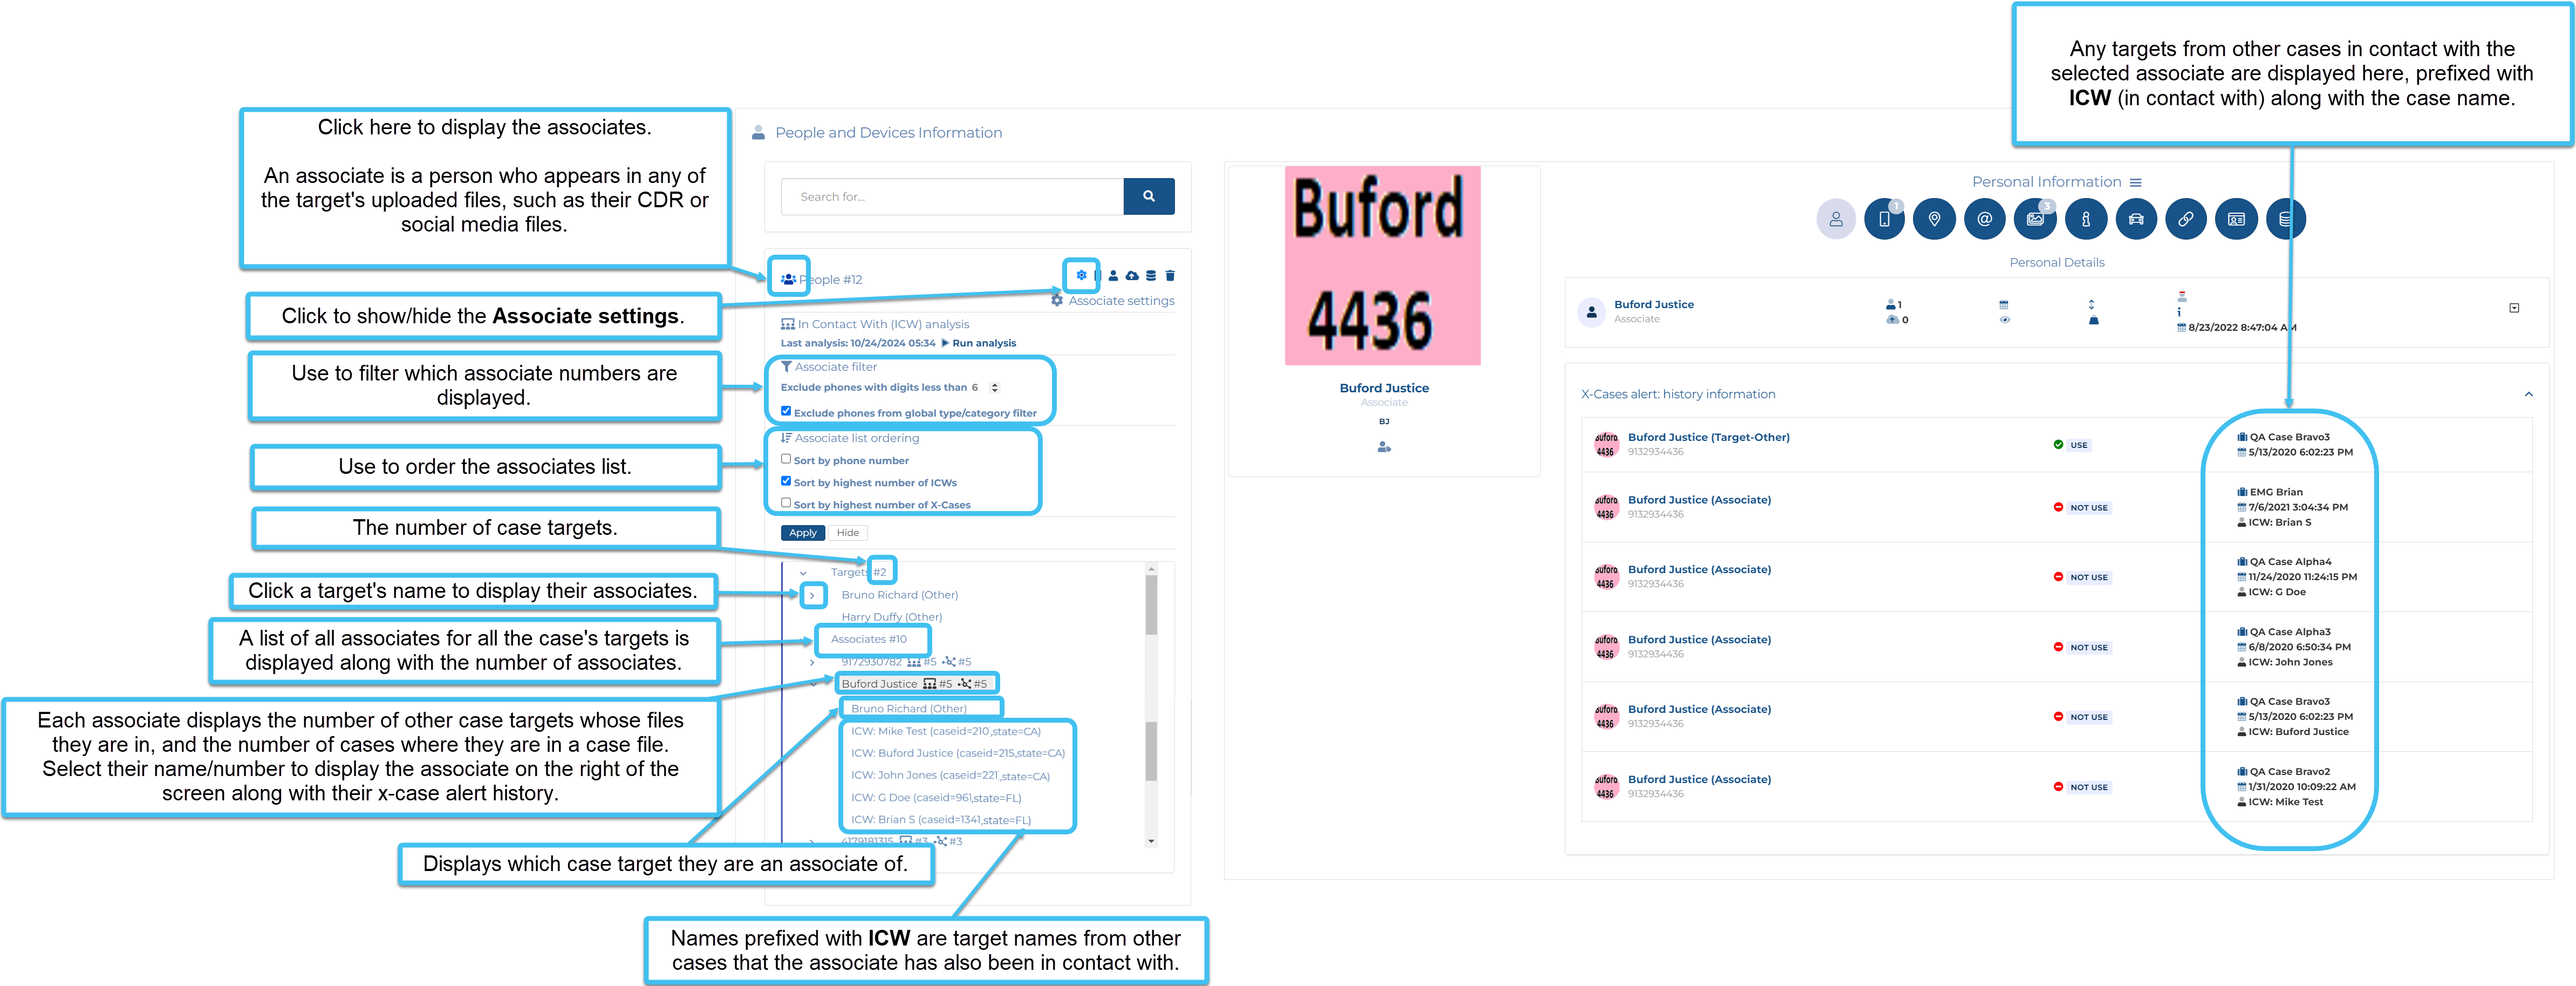
Click to show/hide the target's associates. An associate is a person who appears in any of a target's uploaded files, such as their CDR, social media files and phone data files. When you select an associate their details are displayed and you can edit them if required. If you expand the associate number, then it lists which case targets the number is associated with. If the associate is also an associate of targets in other cases then these target names/numbers are also displayed, prefixed with ICW (in contact with). The case identifier for the case the ICW is in, and ICW's state are also listed (if the area code detected is not in use then NIS (Not In Service) is displayed). The ICW names are also displayed along with the case names in X-Cases alert: history information. The following graphics provide further details of how the associates are displayed including how they can be filtered and ordered and how this information is also displayed along with the other case names in X-Cases alert: history information.
The following graphic is from the People and devices screen, but the same information, with a few exceptions, is displayed on the People and devices tab.
 Associate settings
Click to open settings for filtering and sorting the associate information.
When you first open the associates list it runs an ICW analysis and therefore the ICW associates displayed are up to date. However, if you have the list open for a while and you want to update the list then click Run analysis.
Note that this Run analysis is coupled with People and devices tab on the Analysis tab of the People and devices analysis tab.
You can choose not to display certain phone numbers in the associate list.
Select to exclude shorter numbers that are likely not to be of interest to you such as SMS or voice call from the operator, and ATM bank transactions.
Select to exclude phones which your administrator has set with a type/category that they identified as not being of interest in your analyses, for example phones on the white list. This means that the phones listed are focused on those which are of most interested to you.
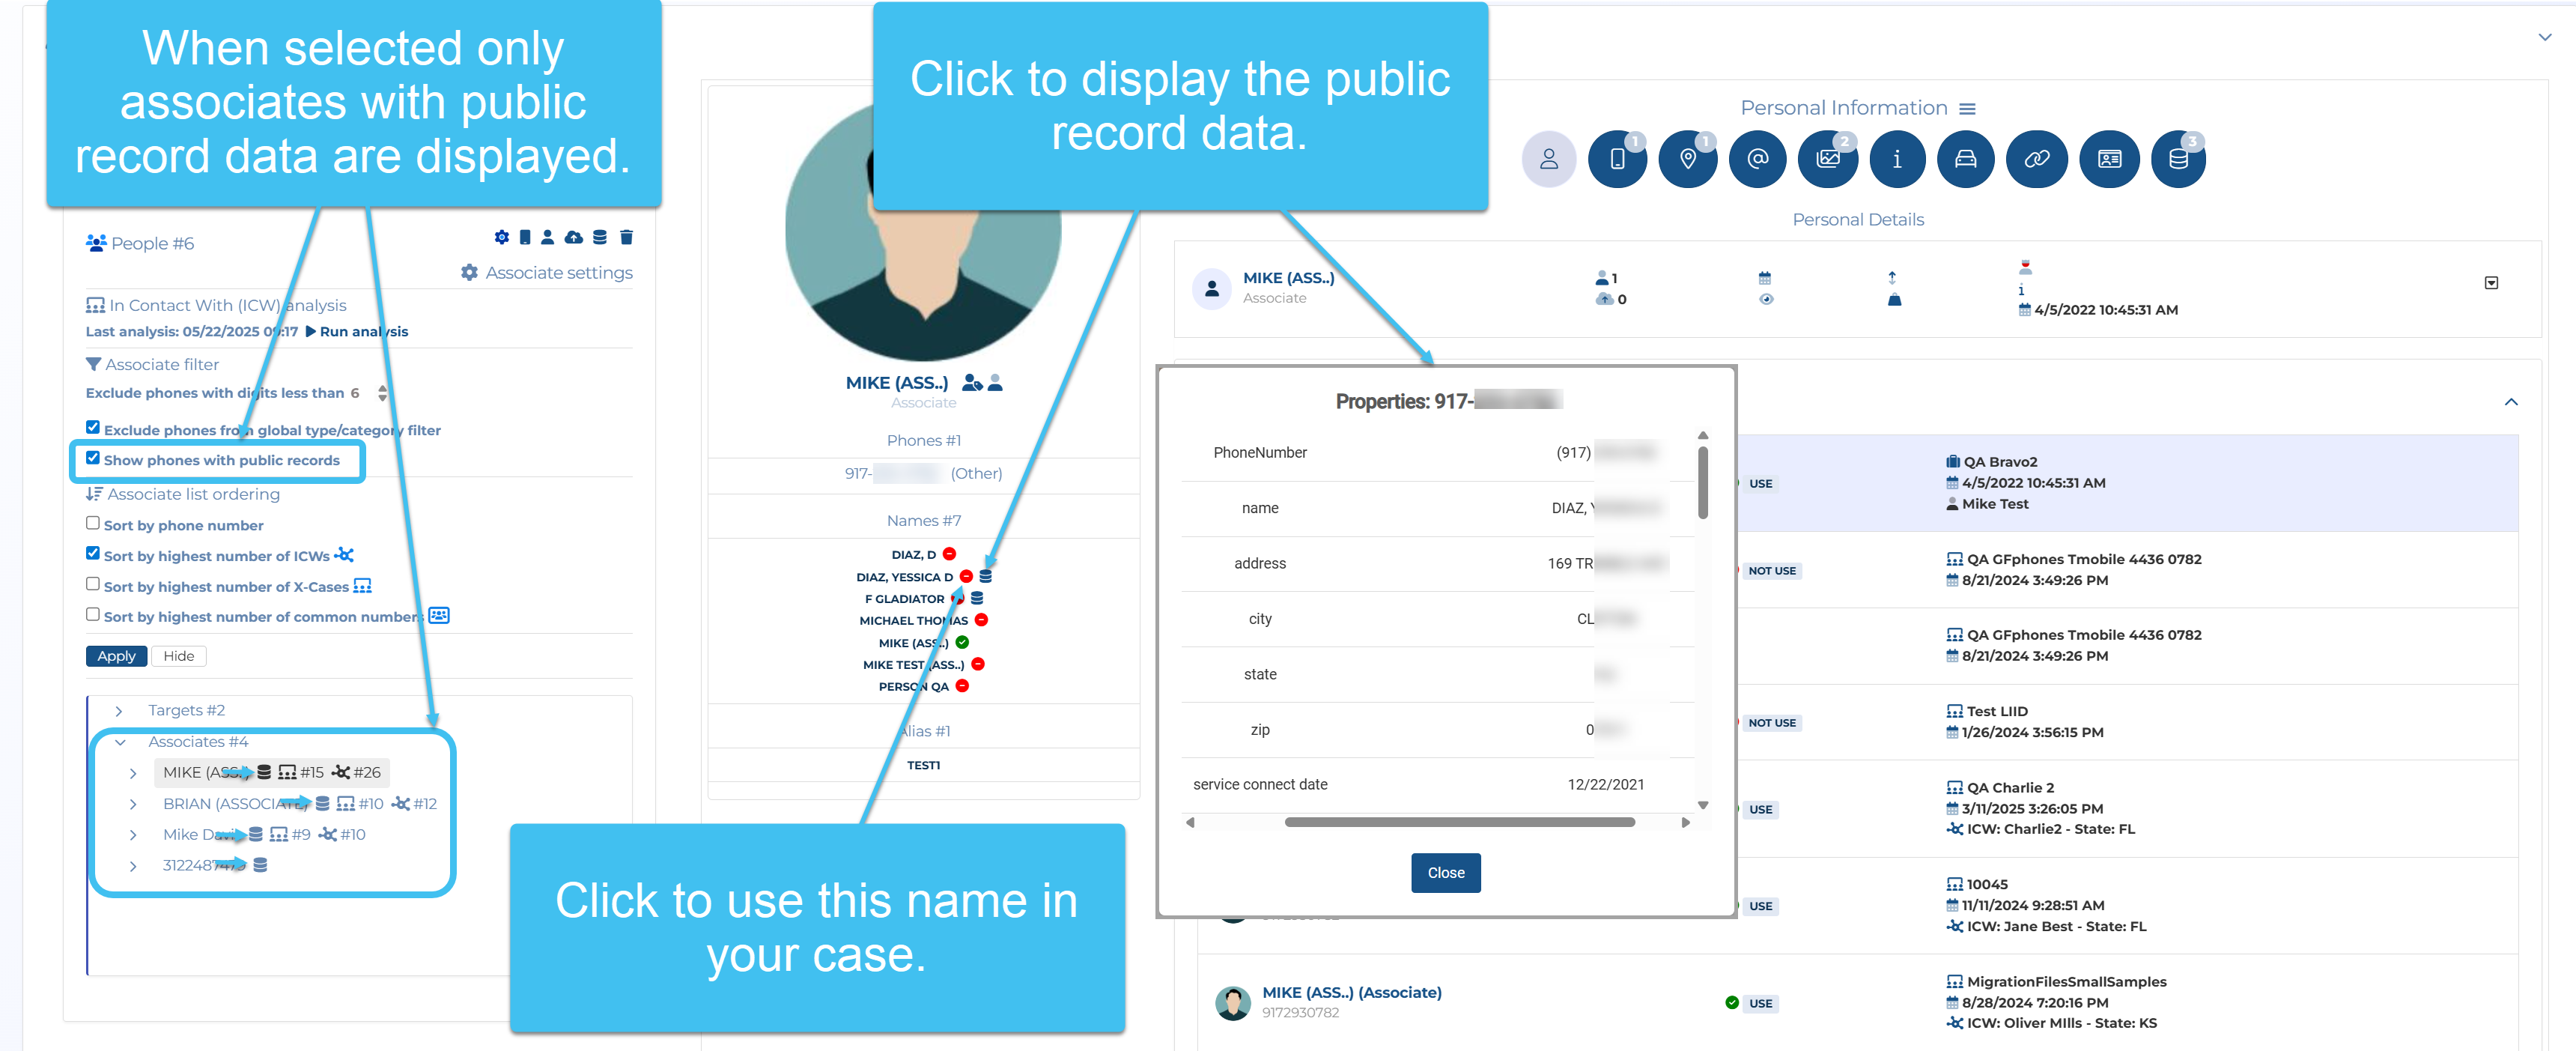
Select to only display the associate phones which have public records data. You can then click on the associate's name, then click on  to view the public records details, and click on
  to use their name from the public records.
You can order the associates list by either:
-
Sort by phone number: which orders the associates list numerically by phone number.
-
Sort by highest number of ICWs
 : which orders the associates list with the phone number that is in contact with the highest number of other case targets first.
 -
Sort by highest number of X-Cases
: which orders the associates list with the phone number that is in the highest number of other cases first. -
Sort by highest number of common numbers
 : which orders the associates list with the highest number of common target numbers.
 New person
Click to add an additional person to the case.
 Personal Details tab
The Personal Details tab, which is always displayed, lets you enter the basic person details. Using  , you can also display some additional settings such as the person's height and weight.
 Description
If you have set Display person as to Description and you do not enter one then it is automatically completed with either the phone number or vehicle plate that you enter.
 First name
If you have set Display person as to use the first and last names and you do not enter a name then First name it is automatically completed with either the phone number or vehicle plate that you enter.
Middle name
This setting is optional. Enter the person's middle name if known.This information is then included in
Last name
This setting is optional. Enter the person's last name. By default both the First name and Last name are used to identify the person on
 Person type
Select whether the person is a suspect, victim, witness, or other. This information is then included in
 Date of birth
This setting is only displayed if Additional info is selected using .
Enter the person's date of birth. This information is then included in
 Eye color
This setting is only displayed if Additional info is selected using .
Enter the person's eye color. This information is then included in
 Height
This setting is only displayed if Additional info is selected using .
Enter the person's height. This information is then included in
 Weight
This setting is only displayed if Additional info is selected using .
Enter the person's weight. This information is then included in
 Hair color
This setting is only displayed if Additional info is selected using .
Enter the person's hair color. This information is then included in
Click to save the person's details.
Click to edit the person's personal details.
Click  to the right of the personal details, to display a menu which contains Edit person.
Click to the right of the personal details, to display a menu which contains Edit alias.
Click to add or delete an alternative name for the person.
Person alias
Enter the alias name.
Click to add the person alias to the list of aliases.

Click to delete the alias name.
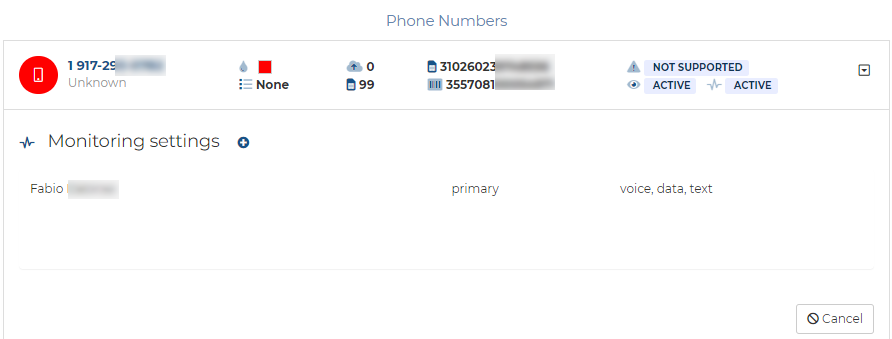
 Phone Numbers tab
The Phone Numbers tab allows you to add, edit and delete a person's known phone numbers. It lists the details of all the phone numbers that have been added to the selected person. Click to the right of the phone number details, to display a menu which allows you to manage the following details for the phone:
- Edit phone
- Contact information
- Smart Track
- Intercept monitoring
- Monitoring settings
- People and devices tab
- People and devices tab
- Re-assign person
- People and devices tab
NOTE: If you edit or delete a phone number any CDR that you have previously imported for the original phone number is deleted.
 Number of files
This display the number of files uploaded for the phone. Click to display the file types and names. You can also delete the files if required.
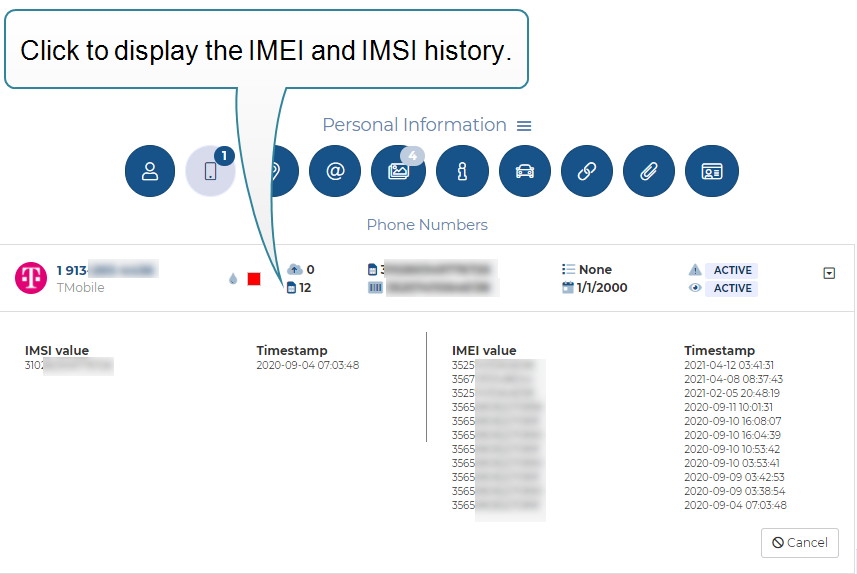
 IMSI/IMEI/ESN/MIN changes
This displays the number of IMSI, IMEI, ESN and MIN updates. Click to display the history of the updates including the values and timestamps.
If you are using a Pen register and it detects an IMEI, IMSI, ESN or MIN then these details are automatically populated and used throughout OSS-ESPA. OSS-ESPA's Smart Track can be configured to notify you of any IMEI, IMSI, ESN or MIN changes so that you are aware of any pertinent changes related to the target device which may require you to reconfigure other equipment in order to accomplish your mission.
Click to add an additional phone number for the person.
Click if you want to delete the phone number you have selected.
to the right of the phone number details, to display a menu which contains Re-assign person.Click if you want to reassign the phone number to a different person. The Re-assign phone to a person dialog box opens.
 Country code
Enter the country code of the selected mobile phone.
 Phone
Phone
 Operator
This setting is mandatory.Select the operator that the mobile phone is registered to.
 Display color
Select a color only if you want to change the color used to represent the currently selected phone from that of the default color for the selected operator. This changes the color of the
This setting is coupled with the Color selector in Sources on the ESPA analysis center screen and with Color selector on the ESPA analysis center's Input and settings view.
IMSI
Enter the International Mobile Subscriber Identity (IMSI) of the Subscriber Identity Module (SIM) of the selected mobile phone. If you are using a Pen register and it detects an IMEI, IMSI, ESN or MIN then these details are automatically populated and used throughout OSS-ESPA. OSS-ESPA's Smart Track can be configured to notify you of any IMEI, IMSI, ESN or MIN changes so that you are aware of any pertinent changes related to the target device which may require you to reconfigure other equipment in order to accomplish your mission.
The most current values are displayed in these fields, and if there are any historical values due to a change in phone, they are displayed if you click the IMSI/IMEI/ESN/MIN changes icon.
 IMEI
IMEI
Enter the International Mobile Equipment Identity (IMEI) of the selected mobile phone. If you are using a Pen register and it detects an IMEI, IMSI, ESN or MIN then these details are automatically populated and used throughout OSS-ESPA. OSS-ESPA's Smart Track can be configured to notify you of any IMEI, IMSI, ESN or MIN changes so that you are aware of any pertinent changes related to the target device which may require you to reconfigure other equipment in order to accomplish your mission.
The most current values are displayed in these fields, and if there are any historical values due to a change in phone, they are displayed if you click the IMSI/IMEI/ESN/MIN changes icon.
MIN
This setting is only applicable for CDMA. Enter the Mobile Identification Number (MIN). The MIN associates the phone with the person's phone number. If you are using a Pen register and it detects a MIN and ESN, then these details are automatically populated and used throughout OSS-ESPA. The most current values are displayed in these fields, and if there are any historical values due to a change in phone, they are displayed if you click the IMSI/IMEI/ESN/MIN changes icon.OSS-ESPA's Smart Track can be configured to notify you of any MIN or ESN changes so that you are aware of any pertinent changes related to the target device which may require you to reconfigure other equipment in order to accomplish your mission.
ESN
This setting is only applicable for CDMA. Enter the Electronic Serial Number (ESN) of the selected mobile phone. If you are using a Pen register and it detects a MIN and ESN, then these details are automatically populated and used throughout OSS-ESPA. The most current values are displayed in these fields, and if there are any historical values due to a change in phone, they are displayed if you click the IMSI/IMEI/ESN/MIN changes icon.OSS-ESPA's Smart Track can be configured to notify you of any MIN or ESN changes so that you are aware of any pertinent changes related to the target device which may require you to reconfigure other equipment in order to accomplish your mission.
 Valid From
Enter the date this phone number first belonged to the person.
 Category
This field only displays details if the identifier has been added to a white or black list using the Global identifiers screen.
This setting impacts both Smart Track and intercept configuration.
-
For Smart Track:
When not selected Smart Track is only available to use if the phone's normal operator supports Smart Track.
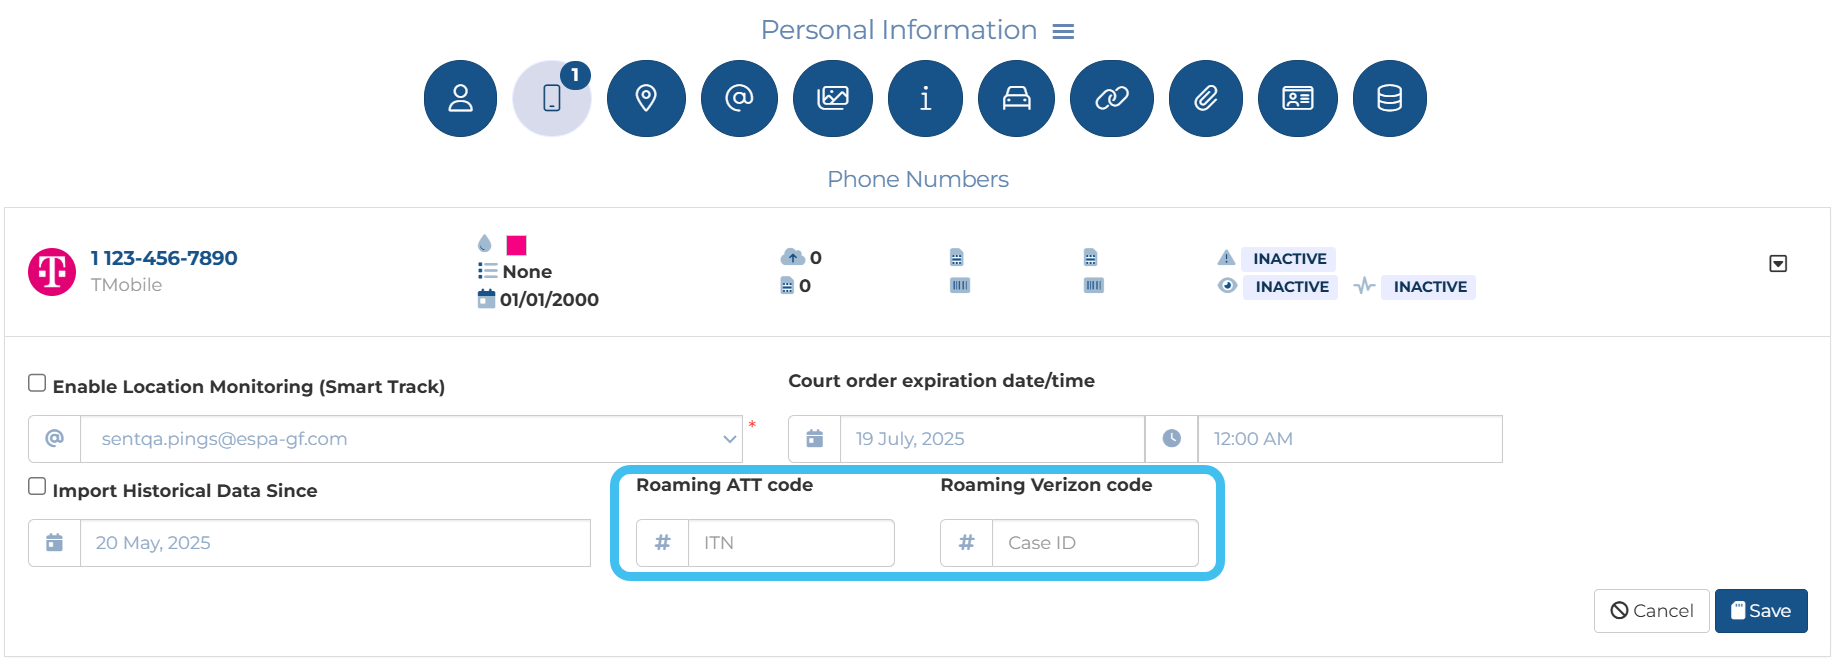
Select an operator if you want to use Smart Track when the phone is roaming on another operator's network. This means that when a phone is roaming you can now receive GPS pings and Smart Track alerts from roaming operators. You must send warrants to any roaming operators who will then supply you with a roaming code when applicable, and provide you with data when the phone is on their network. If you select ATT or Verizon you must also enter the required Roaming <operator> code to the phone's Smart Track settings.
-
For an intercept:
This provides you with any selected roaming operators prefix and suffix when you are configuring an intercept.
Select if you want to use this personal information when a CDR with the same phone number is imported into a new case using the file automatic detection mode. You can also select the date that this personal information should be used from.
If you clear this setting it automatically clears it for this phone in all cases where the date is the same or earlier than the displayed date.
Click to save the person's phone number.
to the right of the phone number details, to display a menu which contains Edit phone.Click to edit the phone's details.
to the right of the phone number details, to display a menu which contains Contact Information.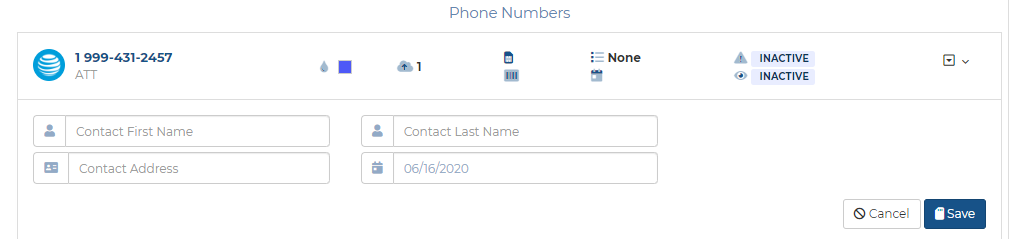
Contact First nameEnter the first name of the person who is subscribed to the selected mobile phone number. This is not necessarily the phone user's name, for example it may be the name of a person in the phone user's family or a phone user's friend.
Contact Last nameEnter the last name of the person who is subscribed to the selected mobile phone number. This is not necessarily the phone user's name, for example it may be the name of a person in the phone user's family or a phone user's friend.
 Contact Address
Enter the address of the person that the selected mobile phone is subscribed to.
 Valid on date
Enter the date that the contact information is valid for the selected mobile phone.
This feature requires option E10 Live location monitoring. If you do not have this option this feature is not available.
Click to the right of the phone number details, to display a menu which contains Smart Track.
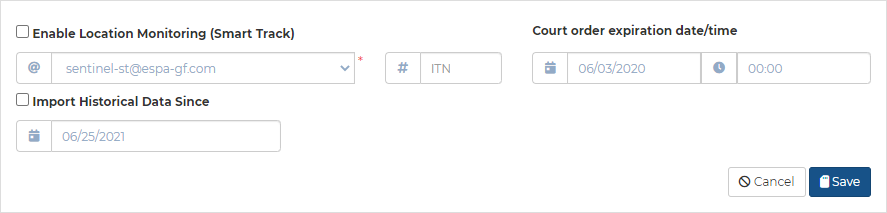
This is only displayed when the selected phone's operator is ATT, T-Mobile, Sprint or Verizon. These settings allow you to manage live call location monitoring on the phone which is based on a GPS ping email interface. Live call location monitoring allows you to monitor a mobile phone's or a vehicle's movement. OSS-ESPA automatically imports live location monitoring events provided by the phone operators and license plate reader providers. For further information refer to Using Smart Track for live location monitoring tracking and alerts.
Select to enable live monitoring of GPS ping data. This also creates an accuracy alert that can be managed on the Smart Track alerts & notifications screen titled "High Accuracy", with an Alert type of "Accuracy" and a Minimum accuracy of "200 meters". If there is already an alert titled "High Accuracy" then the phone is automatically included in the existing alert.
This setting is automatically disabled if there is no data for 15 days. If this occurs then you receive email notification.
 Import from
Select the email address you want the provider to send the live location monitoring email to for the selected phone or vehicle number. The email addresses available are those that were added using the Smart Track monitoring e-mails configuration screen.
 Case ID
This is only applicable if the operator is Sprint or Verizon. Add or edit the Case ID that Sprint or Verizon provides you with for the selected phone number.
ITN
This is only applicable if the operator is ATT. Add or edit the ITN (Individual Telephone Number) that ATT provides you with for the selected phone number.
Select the check-box and choose a date if you require OSS-ESPA to automatically import raw historical live location monitoring for the phone number. When the historical import both starts and completes, notifications are sent to the case owner and case assignees.
 Court order expiration date/time
Enter the date and time that your warrant ends which is when you must stop monitoring the live location monitoring for the phone. By default the date in 60 days time is entered so that if you forget to deactivate the location monitoring, or close the case, then the monitoring automatically stop in 60 days. If the location monitoring ends automatically after 60 days then an email is sent notifying you that the live monitoring has ended.
This setting is only displayed if ATT or Verizon is selected in Roaming operators on the Phone numbers tab.
Enter the codes from the roaming operators. These are other operators within the country that the phone may roam on. If you include these codes, then when the phone is not on its operator's network, but on a roaming network, you can still receive GPS pings and Smart Track alerts. You must send warrants to any roaming operators who will then supply you with the roaming code and provide you with data when the phone is on their network. The following example shows a T-Mobile phone which also had ATT and Verizon selected as roaming operators.
This feature requires option E14 Sentinel. If you do not have this option this feature is not available.
Click to the right of the phone number details, to display a menu which contains Intercept Monitoring. This allows you to manage i-cases on the phone. Any i-cases that have been previously created are listed, and you can also create new i-cases. Click to the right of the i-case, to display a menu which allows you to edit, disable and delete the i-case. For further information refer to Using Sentinel for intercept monitoring.

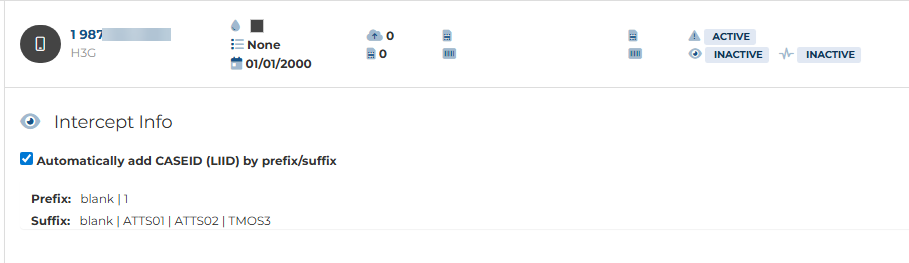
This setting is only displayed if your administrator has configured prefixes or suffixes for the selected operator.
Select if you want to automatically specify the CASEID (LIID) using the phone number and the configured prefixes and suffixes.
All the CASEID (LIID) prefixes and suffixes that your administrator has configured for the selected operator are listed. If Automatically add LIID by prefix/suffix is selected then these prefixes and suffixes are appended to the phone number to automatically specify the CASEID (LIID) so that you do not have to enter it manually in the CASEID (LIID) setting. The "blank" prefix and suffix is used if you want the phone number to be used as the CASEID (LIID).
 LIID
LIID
This setting is not displayed if Automatically add CASEID (LIID) by prefix/suffix is selected.
If displayed this setting is mandatory. Enter the CASEID (LIID) Lawful Interception IDentifier provided by the operator.
For each target identity related to an interception measure an CASEID (LIID) is assigned by the operator which consists of alphanumeric characters or a digit string. It is assigned by the operator to a specific law enforcement agency and may for example contain a lawful authorization reference number, and the date, when the lawful authorization was issued.
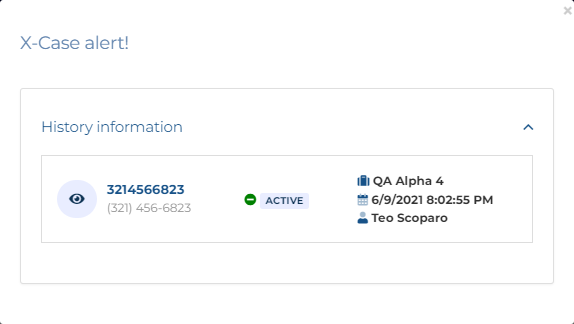
If the CASEID (LIID) is being used in another case then the following alert is displayed notifying you of the case details.
This is also used to identify the i-case on OSS-ESPA screens although you can specify another name to display if required using i-case name.
i-case name
This setting is not displayed if Automatically add CASEID (LIID) by prefix/suffix is selected.
Enter a name for the i-case if you prefer to use a name rather than the CASEID (LIID). This is then used, rather than the CASEID (LIID), on the OSS-ESPA screens to identify the i-case.
Enter the court authorization identifier. This is then displayed on the Evidence Management and Reporting screen and included in the reports.
This displays the timezone of your OSS-ESPA system.
NOTE: When entering the Valid From and Valid To date you must take into consideration the timezone of date/time on the warrant versus the timezone of your OSS-ESPA system. The timezone of your system is displayed above these settings. For example, if the timezone displays "Eastern Standard Time (-5.00)", and the warrant's date/time is in Eastern Standard Time then you must enter the warrant's date/time in Valid From and Valid To. However, if your warrant is in Pacific Standard Time then you must increase the time entered in the Valid From and Valid To settings by 3 hours.
Select the time period you want the CASEID (LIID) to be active for. 30 days is a typical time period that a judge will set for interception.
- To set the Valid From date either use the date/time picker or click Now to select the current date.
- To set the Valid To date either use the date/time picker or select the number of days you want it to be active for then click
 .
.
Note, the CASEID (LIID) is also automatically deactivated if a case is closed.
NOTE: When entering the Valid From and Valid To date you must take into consideration the timezone of date/time on the warrant versus the timezone of your OSS-ESPA system. The timezone of your system is displayed above these settings. For example, if the timezone displays "Eastern Standard Time (-5.00)", and the warrant's date/time is in Eastern Standard Time then you must enter the warrant's date/time in Valid From and Valid To. However, if your warrant is in Pacific Standard Time then you must increase the time entered in the Valid From and Valid To settings by 3 hours.
Select the path you want used to store the Sentinel case data. This is especially important for jurisdictions that are required to physically store evidence in the authorizing jurisdiction of the legal demand. The options that are available to you were configured by your administrator who also defines which data is archived and when.
Select the path you want used to store a backup of the Sentinel case data. This is especially important for jurisdictions that are required to physically store evidence in the authorizing jurisdiction of the legal demand. The options that are available to you were configured by your administrator who also defines which data is archived and when.
If you want to add a new court authorization, then edit the court authorization id, valid to/from dates and the evidence storage then click this button. The new data is added to the table.
Note, this does not save any changes you make to Location, Post cut thru digits or Content.
If you want to update the current court authorization id, valid to/from dates or the evidence storage then edit them then click this button. The data is updated in the table.
Note, this does not save any changes you make to Location, Post cut thru digits or Content.
Select if you have been authorized to analyze the location data in the intercepts provided by the operator. For example location data can include cell site or geo-location information such as the GPS coordinates. If this setting is not selected then OSS-ESPA minimizes any location data in the intercepts for the CASEID (LIID).
Select if you have been authorized to analyze the digits the phone user dialed after the call was connected. For example this could be the digits dialed on the phone when the phone user was calling an automated bank number and inputting their PIN or passcode. If this setting is not selected then OSS-ESPA minimizes all text message content in the intercepts it receives for the CASEID (LIID).
Select if you have been authorized to analyze the voice content in the message provided by the operator. If this setting is not selected then OSS-ESPA minimizes all voice message content in the intercepts it receives for the i-case.
When this is selected you must also select the audio delivery method, either VoIP or an analog line.
Select if you have been authorized to analyze the actual body of the text message provided by the operator. For example text message content can include text, photos and videos. If this setting is not selected then OSS-ESPA minimizes all text message content in the intercepts it receives for the i-case.
Select if you have been authorized to analyze the data content in the message provided by the operator. For example the Web sites visited and IP addresses. If this setting is not selected then OSS-ESPA minimizes all data content in the intercepts it receives for the i-case.
Click to select all the intercept authorization check-boxes.
Click to clear all the intercept authorization check-boxes.
This feature requires option E14 Sentinel. If you do not have this option this feature is not available.
This feature is only available if your account is configured as an administrator or a monitor supervisor.
Click to the right of the phone number details, to display a menu which contains Monitor settings. This allows you to view who is configured to monitor the i-cases, their priority order and what they have permission to monitor. If you want to change the monitor settings:
-
 Click to open the Create new monitoring settings screen which allows you to manage the monitor settings for the currently selected i-case.
 -
 Click to open the Queue management screen which allows you to create new monitoring settings.
 Addresses tab
The Addresses tab allows you to add and manage addresses that are related to the person, for example their home, their parents home and their place of work. Addresses for the person that are detailed in public records can be easily added here using Save to addresses. These addresses are displayed on the Locations of interest screen (Wizard), grouped by the person they belong to. You must enter both the latitude and longitude if you want the
Click to add a new address.
Select if you want the address added as a target location. The address is then added to the addresses listed on the Locations of interest screen (Wizard), and is included on the ESPA analysis center, IQ packets, analysis center reports, analyses, and live location monitoring.
If the address originally came from a public record then the Location type is set to "Public records".
Description
Enter an optional description of the address which is useful to you, for example "Parent's home". If the address has been added from a public record using Save to addresses then this setting is automatically populated with "Saved from public record".
Enter the address details of the target location.
This is displayed beside both the Street address and Latitude/Longitude. Enter which type of details you know then click to open the Find results dialog box which lists the possible addresses. If you select one it automatically completes the latitude and longitude or address details based on the details you have already entered on the screen. It also displays the address on the map.
 Latitude
Enter the latitude of the address. You must enter both the latitude and longitude if you want the
Longitude
Enter the longitude of the address. You must enter both the latitude and longitude if you want the
Valid from
Enter the date that the location became a valid date for the person. For example, the date they purchased the property at the address.
Click to save the person's address.
Click to the right of the address details, to display a menu which contains Edit address.
Click to edit the address details.
Click to the right of the address details, to display a menu which contains Delete address.
Click to delete the address details.
 Accounts tab
The Accounts tab allows you to record the details of the person's known accounts, such as the details of their Facebook or Twitter account. You can
Click to add a new account.
 Service
Select the account type that you want to enter details for.
Valid from
Select the date that the account was valid from.
 Account identifier
This displays the identifier used for the account. If you have uploaded the person's social media files then this is automatically entered from the file. However, if you are configuring Smart Track to use social media emails you must manually enter this. For WhatsApp identifiers, it is optional whether or not you include the + at the start of the identifier.
User/Vanity name
This displays the user name used for the account. If you have uploaded the person's social media files then this is automatically entered from the file. However, if you are configuring Smart Track to use social media emails you must manually enter this.
Click to save the person's account.
to the right of the account details, to display a menu which contains Delete account.Click to edit the account details.
Click to the right of the account details, to display a menu which contains Smart Track. This allows you to manage Smart Track and intercept monitoring on the account.
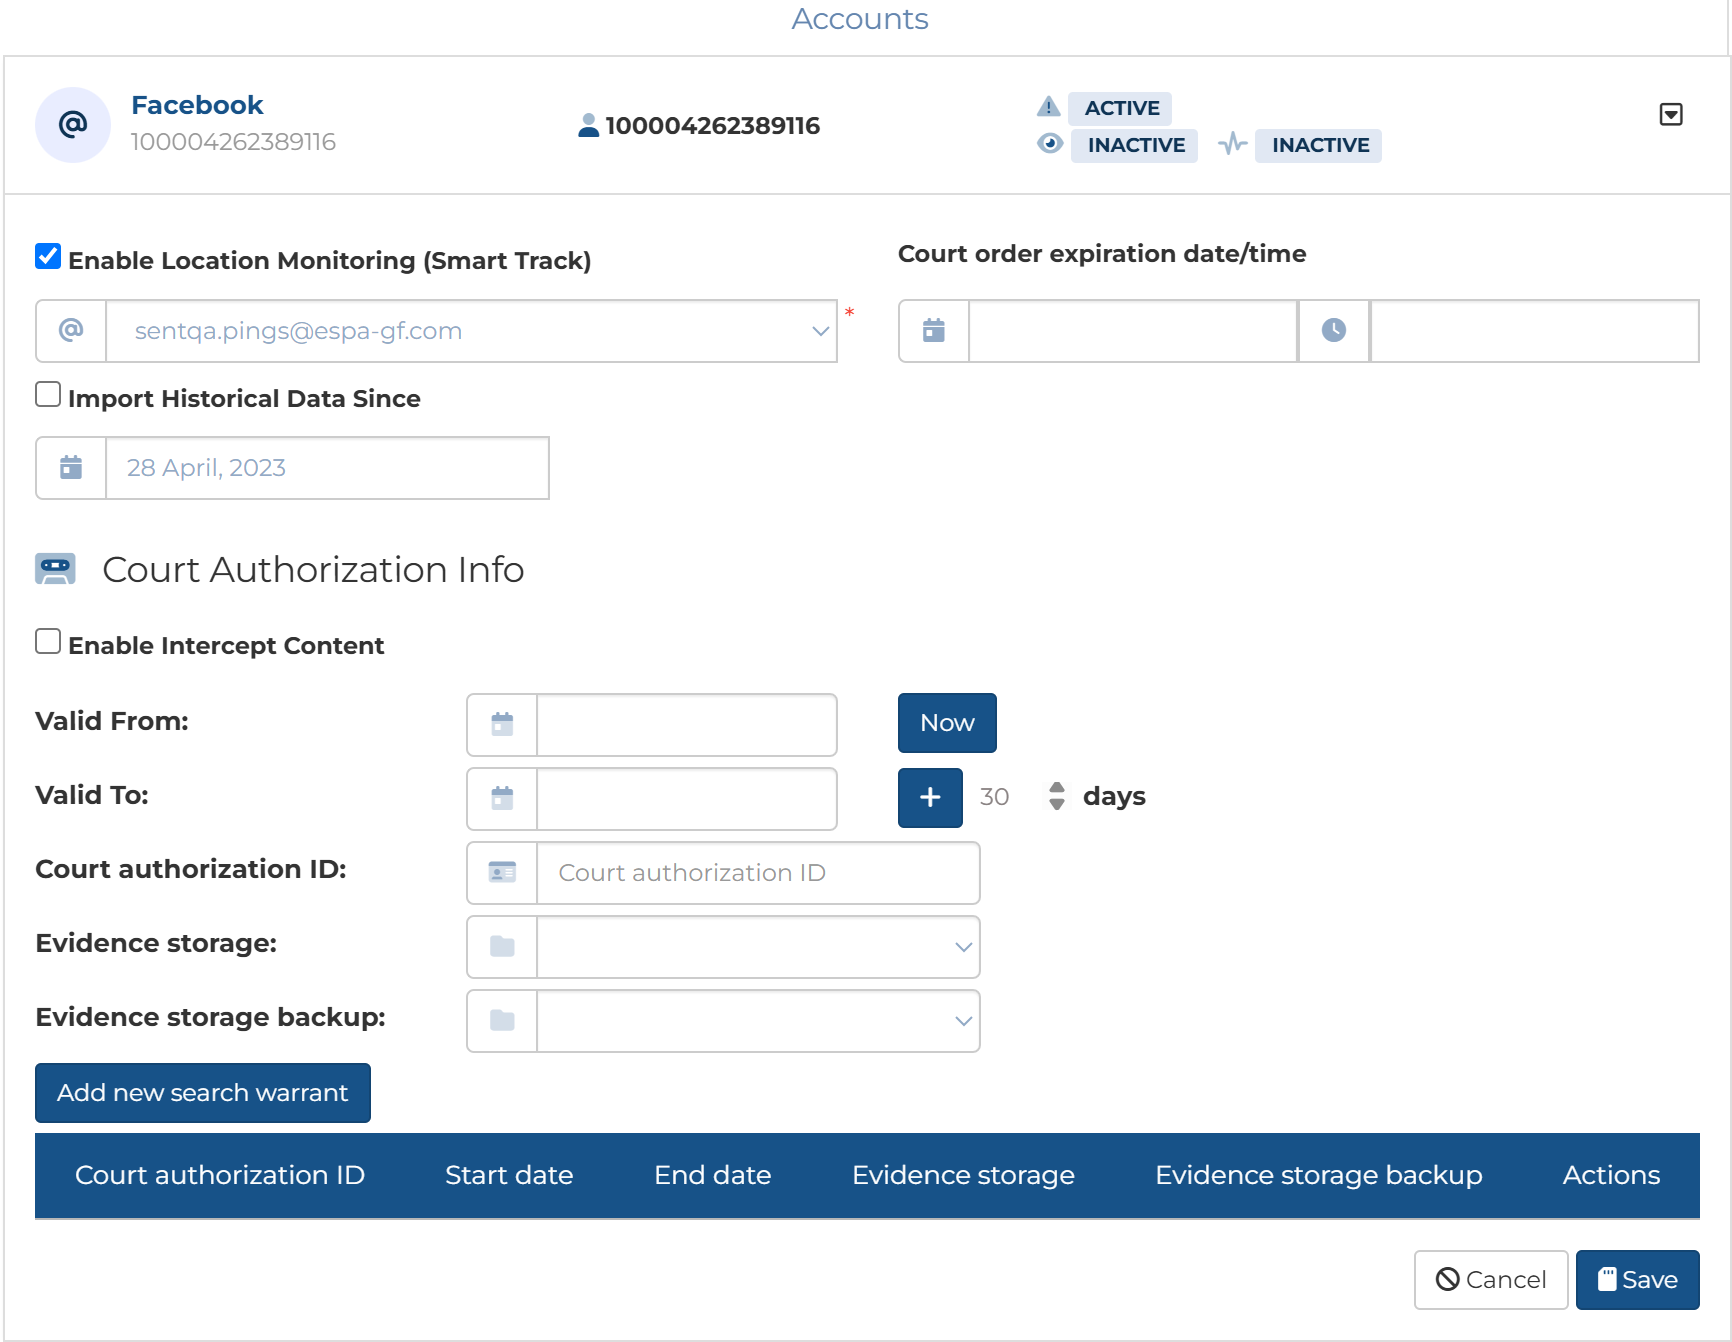
Select to enable live monitoring of GPS ping data. This also creates an accuracy alert that can be managed on the Smart Track alerts & notifications screen titled "High Accuracy", with an Alert type of "Accuracy" and a Minimum accuracy of "200 meters". If there is already an alert titled "High Accuracy" then the phone is automatically included in the existing alert.
This setting is automatically disabled if there is no data for 15 days. If this occurs then you receive email notification.
Import from
Select the email address you want the provider to send the live location monitoring email to for the selected account. The email addresses available are those that were added using the Smart Track monitoring e-mails configuration screen.
Select the check-box and choose a date if you require OSS-ESPA to automatically import raw historical live location monitoring for the account. When the historical import both starts and completes, notifications are sent to the case owner and case assignees.
Court order expiration date/time
Enter the date and time that your warrant ends which is when you must stop monitoring the live location monitoring for the account. By default the date in 60 days time is entered so that if you forget to deactivate the location monitoring, or close the case, then the monitoring automatically stop in 60 days. If the location monitoring ends automatically after 60 days then an email is sent notifying you that the live monitoring has ended.
Select the time period you want the T3 intercept to be active for. 30 days is a typical time period that a judge will set for interception.
- To set the Valid From date either use the date/time picker or click Now to select the current date.
- To set the Valid To date either use the date/time picker or select the number of days you want it to be active for then click .
Note, the T3 intercept is also automatically deactivated if a case is closed.
Enter the court authorization identifier. This is then displayed on the Evidence Management and Reporting screen and included in the reports.
Select the path you want used to store the Sentinel case data. This is especially important for jurisdictions that are required to physically store evidence in the authorizing jurisdiction of the legal demand. The options that are available to you were configured by your administrator who also defines which data is archived and when.
Select the path you want used to store a backup of the Sentinel case data. This is especially important for jurisdictions that are required to physically store evidence in the authorizing jurisdiction of the legal demand. The options that are available to you were configured by your administrator who also defines which data is archived and when.
If you want to add a new search warrant, then edit the court authorization id, valid to/from dates and the evidence storage then click this button. The new data is added to the table.
If you want to update the current search warrant, valid to/from dates or the evidence storage then edit them then click this button. The data is updated in the table.

Click to remove the selected court authorization.
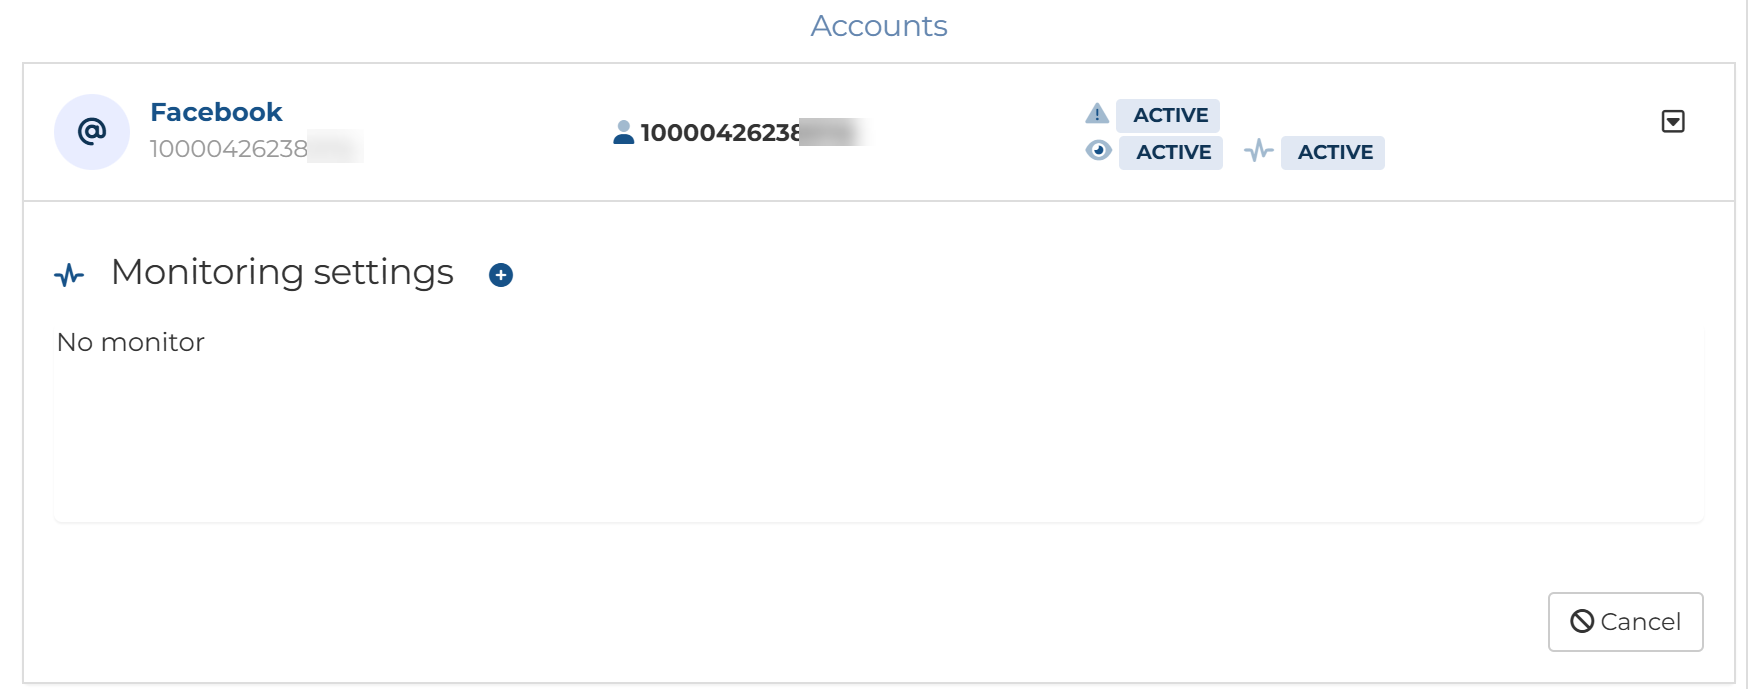
This feature is only available if your account is configured as an administrator or a monitor supervisor.
Click  to open the Monitor settings. This allows you to view who is configured to monitor the T3 intercept, their priority order and what they have permission to monitor. If you want to change the monitor settings:
-
Click to open the Create new monitoring settings screen which allows you to manage the monitor settings for the currently selected account.
-
Click to open the Queue management screen which allows you to create new monitoring settings.
Click to the right of the account details, to display a menu which contains Upload file.
Click to upload a social media pdf, .csv, .xlxs and .txt file for the account.
Click to the right of the account details, to display a menu which contains Delete account.
Click to delete the account details.
 Info tab
The Info tab lists all the tags and notes that have been added to the person, and allows you to delete them.
Click to add a new note or tag.
Click to the right of the info details to display a menu which contains Edit info. This allows you to edit the note and tag. If you edit the details you must click Save to save any changes otherwise any changes you make are lost if you move to another screen.
Click to the right of the info details to display a menu which contains Delete info.
Click if you want to delete the info.
 Vehicles tab
The Vehicles tab allows you to add, edit and delete a person's known vehicle plate numbers.
Adding vehicles is only required if you have files such as GPS tracker files or License Plate Reader files to upload, or if you have geo-location files associated with a vehicle which automatically upload through live location monitoring.
NOTE: If you edit or delete a vehicle any geo-location files that you have previously imported for the vehicle are also deleted.
Click to add an additional vehicle for the person. This clears any vehicle details that were currently displayed which then allows you to add a new vehicle.
 License plate
This setting is mandatory. Enter the license plate of the vehicle. This plate is then available for analysis and is included in
 Model
Model
Enter the model of the vehicle. This information is then included in
Year
Enter the year of the vehicle. This information is then included in
 Manufacturer
Enter the manufacturer of the vehicle. This information is then included in
 Color
Color
Select the color of the vehicle. This information is then included in
Display color
Select the color used to represent the vehicle.
This setting is coupled with the Color selector in Sources on the ESPA analysis center screen and with Color selector on the ESPA analysis center's Input and settings view.
 State
State
Select the state the vehicle is registered in. This information is then included in
Valid From
Select the date that the vehicle was purchased. This information is then included in
Click to save the person's vehicle details.
Click to the right of the vehicle details to display a menu which contains Edit vehicle.
Click if you want to edit the vehicle. If you edit the details you must click Save to save any changes otherwise any changes you make are lost if you move to another screen.
Click to the right of the vehicle details to display a menu which contains Smart Track.
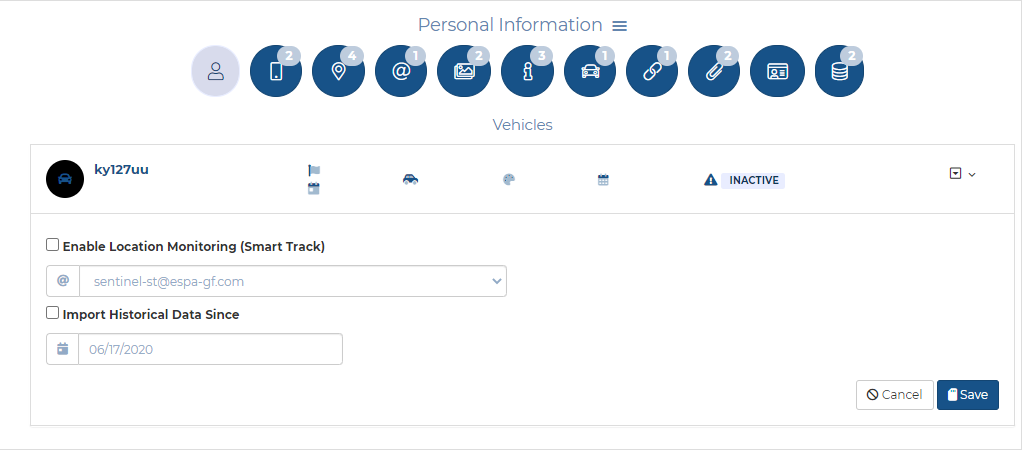
These settings allow you to manage live call location monitoring on the vehicle, which is based on a GPS ping email interface. Live call location monitoring allows you to monitor a vehicle's movement. OSS-ESPA automatically imports live location monitoring events provided by the phone operators and license plate reader providers. For further information refer to Using Smart Track for live location monitoring tracking and alerts.
Select to enable live monitoring of GPS ping data. This also creates an accuracy alert that can be managed on the Smart Track alerts & notifications screen titled "High Accuracy", with an Alert type of "Accuracy" and a Minimum accuracy of "200 meters". If there is already an alert titled "High Accuracy" then the phone is automatically included in the existing alert.
This setting is automatically disabled if there is no data for 15 days. If this occurs then you receive email notification.
Import from
Select the email address you want the provider to send the live location monitoring email to for the selected phone or vehicle number. The email addresses available are those that were added using the Smart Track monitoring e-mails configuration screen.
 Code
Code
If the vehicle is a Ford manufactured vehicle that has a code that allows the vehicle to be tracked then enter the code here. This means that if the Ford code triggers a Smart Track alert you will receive a notification. The code may be provided in the Ford email either in the subject or the content.
Select the check-box and choose a date if you require OSS-ESPA to automatically import raw historical live location monitoring for the vehicle. When the historical import both starts and completes, notifications are sent to the case owner and case assignees.
Click to the right of the vehicle details to display a menu which contains Delete vehicle.
Click if you want to delete the vehicle.
NOTE: Any geo-location files associated with the vehicle are also deleted.
 Hyperlinks tab
The Hyperlinks tab allows you to add and manage any useful URLs related to the person. This information is then included in
Click to add an additional hyperlink for the person.
Click to the right of the hyperlink details to display a menu which containsEdit hyperlink.
Click if you want to edit the hyperlink. If you edit the details you must click Save to save any changes otherwise any changes you make are lost if you move to another screen.
Click to the right of the hyperlink details to display a menu which containsDelete hyperlink.
Click if you want to delete the hyperlink.
 URL
URL
Enter any useful URL related to the person. This information is then included in
Click to save the person's URL.
 Government IDs tab
The Government IDs tab allows you to enter a variety of Government issued numbers related to the person. This information is then included in
 SSN
SSN
Enter the person's social security number. This information is then included in
 Driver License
Enter the person's driver license number. This information is then included in
 Passport
Enter the person's passport number. This information is then included in
 Arrest ID
Enter the person's arrest ID. This information is then included in
Click to save the person's government IDs.
 Public records tab
The Public records tab displays all the public records associated with the person, with a summary of the details for each. You can click  to set whether or not the public record is used in the case. The name of the person whose CDR a CLEAR or Whooster request was performed on, which generated this public record information, is also displayed.
Click to the right of the public record details to display a menu which contains View details.
Click to view the complete public record details.
Click to the right of the public record details to display a menu which contains Save to addresses.
Click to save the address to the Addresses tab. You are prompted on whether or not you also want to save the address as a target location. If you select yes, then the address is saved as a target location along with details of the name and phone number of the public record it was saved from. These details are then displayed in a number of OSS-ESPA screens such as: the Details tab on the Locations of interest screen (Wizard), the Target locations tab on the ESPA analysis center screen and the location's pop-up on the Sentinel screen's map.